
Here in my final installment of my series on building the USS Midway, we will get to the finishing touches of the model. So far we’ve researched the history of the ship and its various rebuilding phases, and had a go at identifying and installing the important modifications. This time we put on all the stuff that makes the ship come to life (in 1/800 scale, more or less).
When we last spoke, I was saying how it was time to have a thought about the air wing components before we attach the deck to the hull. But before we get ahead of ourselves, let’s go back and build the ship. Sounds reasonable? I thought so too.
So you’ve decided on your phase of the ship. Assemble the hull per instructions, with the following considerations:
- The flight deck and up, and the hull below the flight deck, can be considered separate sub-assemblies and you can build in either order. Last time I talked a lot about modifications to the island. If you build those first and attach the island to the deck before building the hull, that’s OK– but I would install all the deckside catwalk assemblies first.
- Omit the outboard rudders. The Midway was built with only two, and always had only two. They were enlarged during one of the later rebuilds, but the number remained the same. File off the mounts for the extra rudders. (Yeah, I didn’t discover this until it was too late.)
- If you’re modeling anything post-1977, omit the three 5″ guns.
- Build platforms for the Sparrow launchers and (post-1985) the Phalanx units. The Sparrow boxes are simply squares of .040 styrene with some notches cut in them to represent the launch tubes; the Phalanxes were carved from bits of sprue to shape.
- Don’t install the deck-edge radio antennas. See comments below.
- Refer back to my instructions for installing the hangar deck.
Once the hull is done, see my remarks about paint colors. Those apply to everything above the waterline. Paint that area first. Everything below it is an anti-fouling red, with a black waterline stripe. Here my model railroading materials came in handy. Southern Pacific Scarlet is a pretty good shade for the red. I masked at the waterline and sprayed the red. Once it was good and dry I applied some fat black railroad stripes along the waterline, then overcoated everything with a semi-gloss clear spray.
Now, onward to the air group research! Thanks to the interwebs, I came across a website that has that exact information. Since I have chosen to model the ship as she appeared in Desert Storm, I had a look at the page and came up with the following squadron list for the ship:
- VFA-151 Vigilantes (F/A-18A)
- VFA-195 Dambusters (F/A-18A)
- VFA-192 Golden Dragons (F/A-18A)
- VA-185 Nighthawks (A-6E)
- VA-115 Eagles (A-6E)
- VAW-115 Liberty Bells (E-2C)
- VAQ-136 Gauntlets (EA-6B)
- HS-12 Wyverns (SH-3H)
To distill that down for you, for 1991 you need the following aircraft types: F/A-18, A-6E, EA-6B, E-2C, and SH-3H. Fortunately, the stock sprue with the kit includes all of these. Unfortunately, it doesn’t have nearly enough. Fortunately, I had some leftover F/A-18s from helping my friend model the Kitty Hawk, so I managed a convincing-enough deckload of aircraft for my purposes. Feel free to source these from other places– in fact, one can buy aftermarket planes (such as the 1/700 ones by Trumpeter) that are of much better detail than the ones included in the kit. I didn’t bother. Incidentally, refer to the prior discussion about the fuzzy scale of this ship– I think the 1/700 planes would look just fine here.
Now, a word about the Navy’s aircraft tactical paint standards. As it turns out, 1991 was a transitional period. A new, darker gray tactical protocol had been in place for a couple of years, but if you look at photos of 1991 not all aircraft had been repainted. I decided to mix the schemes in my air group. I can’t tell you which squadrons were still in the old paint, so I just arbitrarily picked some for each scheme. The leftover F/A-18’s from the Kitty Hawk were already in light gray anyway, so I simply painted the ones that came in my kit into the darker tactical scheme. My A-6’s are about a half-and-half mix; the EA-6’s all got the dark tactical scheme.
The next thing to consider is that each squadron is allowed one “show bird”, typically flown by the Squadron commander or the CAG, with a flashy colorful paint scheme (the rest of the birds in the squadron will have a shades-of-gray rendering of the design). Now, painting a show bird in 1/800 is a challenging exercise! I decided to do the CO’s plane for the VFA-195 Dambusters (F/A-18A, green/yellow), the VFA-192 Golden Dragons (F/A-18A navy/yellow), and the VAW-115 Liberty Bells (E-2C). I also painted the two SH-3H choppers differently: one in the 1980’s light gray and the other in the later tactical gray. Now, finding what these “show bird” schemes looked like in 1991 is challenging, but I made my best guess again on this.
And finally: carrier aircraft have folding wings in nearly all cases; definitely all cases for my timeframe. But the tiny little planes provided in the kit do NOT have folded wings. Considering that wings are nearly always folded except when in the take-off cycle or when landing, this means that the modeler gets to spend a lot of effort chopping and re-attaching tiny little wings onto tiny little aircraft. Rather than get specific, I’ll merely counsel you to do your photographic research on where to cut them and how to install them properly. And if you believe that you’re a real badass modeler, fold the rotors on the choppers, correctly. It took me one try…

OK. Now that you’ve decided your era and sorted out the appropriate aircraft, process a couple of them by folding their wings and painting them, and cement them to the hangar deck just inside the elevator door. I put a drop of gel superglue on each landing gear and then position them. I really don’t recommend using the MEK for this; too much can go wrong. For one thing, if it comes loose inside the ship, then what do you do?
OK, let’s assume that the modified island has been installed, along with the crane and all the superstructures; you’ve attached the deck; you’ve mounted the Sparrows and Phalanxes; you’ve installed all the other hull details in the instructions; you’ve cemented the deck onto the hull. Now is a good time to do the rotable deck-edge antennae. Last time I suggested waiting till later to install them, recall? OK, now is the time. But do this: trim off all the antennas from the mounts, and throw them far away. Keep one for reference. After seeing how chunky the stock antennas looked in my test photos, I replaced them with styrene .022 X .022″ posts. Even this is a little heavy, but the styrene attaches more securely than using steel wire so I chose to go that way. For the double antennas, cut a small rectangle of .010 sheet and cement the posts to that, then install the mounting tab under the catwalks, then cement the antenna assembly to the tab at an angle parallel to the horizon. Consult photos. Paint these light-medium gray.

Oh, a funny thing about the Midway’s paint. As she appeared in 1991, her deck was a typical dark gray shade (mine is too light, but oh well); her hull was actually a lighter shade than most other carriers in the fleet, and her island was actually a darker shade of gray than most other ships. I ended up using Model Master Medium Gray for the island, and mixing my own lighter shade for the hull. Also notice how the front end of the island is painted black, as is the port side below the catwalks, and all superstructure above the level of the stacks.

There’s one detail that I initially was going to omit, mostly because of the work involved, and that is the little gallery under the flight deck astern. The vertical optical landing assist array (not sure the exact nomenclature here, but it’s the 2-piece orange assembly that hangs down behind the landing deck centerline) is attached to this. But after I had basically completed the ship, the omission kept bugging me and I finally caved in. It’s basically a square box that hangs down, with equal openings on each side. A catwalk connects to the fantail, supported by a couple of struts. Refer to the photos. I installed that, then fabricated some strips with bumps on them, and installed all of that. The gallery gets the light hull color, and the strips a yellow/orange shade.

Another detail I really wanted was the jet blast deflector(s). To model one I cut a piece of .010 styrene in a suitable rectangle, figured out where it should be mounted (note: do NOT trust the markings on the Arii model’s deck), and cut four tiny pieces of .022 square strip to support it at the right angle. Consult real photos, and mine here, to get the idea. Since I was modeling a launch cycle with part of the foredeck cluttered with aircraft, only the port-side catapult is in use and I could get away with making just one. Incidentally, on the real ships the deflector drops into a recess on the deck, but I wasn’t going to carve that out. Instead I just painted a lighter rectangle to represent the recess.

Don’t forget about the mobile crane and the two donkeys. The real ship had a swarm of these low plane-handling tractors, but the kit only includes two. Paint them in the same safety yellow shade as the landing array– I used Accuflex D&RGW Yellow, a railroad color that’s basically School Bus Yellow.
Also- let’s chat about the decals. The Arii kit has raised marks that correspond with the decals (for the most part). There are a couple of things to note, before you apply them.
- The landing deck center stripe was far too orange on my decal sheet– it should be closer to yellow. However, I just gritted my teeth and used it anyway.
- Post-1986 the Navy omitted that long arrowed line that starts across from the island and goes to the bow. This is a guideline for Harrier jets. The deck has it molded in; again, grit your teeth, or sand it off before painting.
- The “foul lines” on the forward deck are molded on but no decals are provided. I used a fine brush and some white calligraphy ink to spot in each stripe for these lines. Painstaking but not as hard as it sounds.
- The large “41” deck numerals are the wrong style for my period. Correct ones are available from aftermarket vendors. I just gritted my teeth. The molded ones on the deck are not a perfect match, either.
- The raised numerals on the sides of the island: whiskey tango foxtrot?!? I’m wearing my teeth down to stumps now.
I use Microscale Micro-Sol to set the decals into place. This dissolves most of the film leaving the graphics behind. Just be really careful and don’t touch these while processing; they look dry when they are NOT.
After all of your decals are in place, overspray the deck and island with matte or flat finish. Mine’s a little too shiny but I’ll just pretend it’s raining…
At this stage of construction, the ship itself is essentially complete. Now it’s time to bring it to life. We do this with the aircraft, and– yes– with people. Tiny, tiny little people.
Having decided on our era, and having identified the composition of the air group, it’s time to decide what they are doing right now. This gives you a lot of latitude. For instance, the ship could be just cruising right now, with planes stowed all over the deck. Or it could be running limited patrols. Or it could be in port (go back and cut off all those horizontal antennas and mount them vertically!). Or it could be in a launch cycle. Or a landing cycle. Or the second or third launch cycle of a major raid. Or the second or third landing cycle. Each situation can be depicted by how the planes are spotted, and by what the deck crew are doing.
(I’m assuming that, like me, you will permanently mount your planes so that they don’t get lost or anything. If not, ignore the bits about glue that follow.)

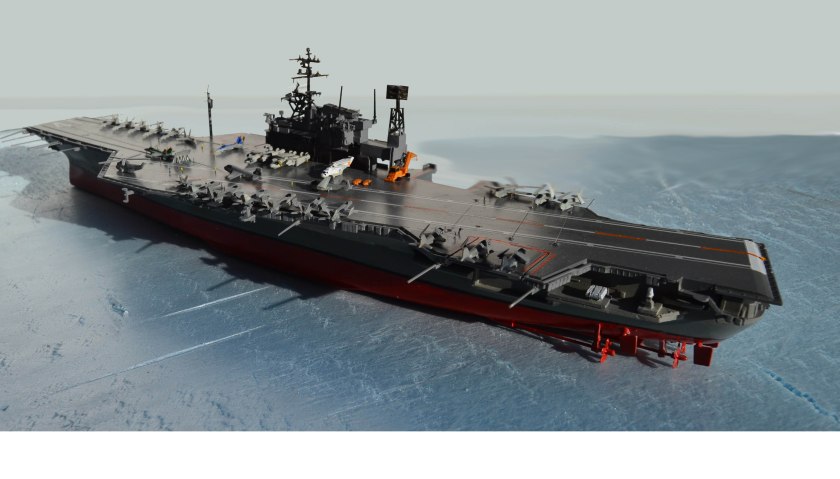
Since my era is Desert Storm, I decided to set things up during a launch cycle, probably a second or third one, where a followup strike is being sent into Iraq. Some of the planes landed from earlier strikes have been stashed forward, so only the port catapult is available right now. An A-6 is being fueled near the No. 3 elevator, and another is being armed across the deck from it. One of the choppers is preparing to take off for plane guard duty. The Dambuster CO is on the catapult, engines at full military power, while other aircraft queue up to launch. A pair of E2-C’s and a second chopper are parked by the island.

What brings this scene to life is the presence of the appropriately-colored and appropriately-sized crewmembers around the deck. These I discovered online, and just had to have them. They’re made by Eduard, a Czech company, and are 1/800 scale etched metal. Each one is painted in one of the correct deck uniforms for a modern US carrier. I paid about $13, which seems a lot, but there are plenty of pieces provided to outfit several ships. I mounted around 45 of them and there are many more remaining.

A note about painting the aircraft: these were all done by hand. Some were airbrushed while on the sprue for the overall color, but I had to hand-paint the canopies (navy blue) and any other details that required it, especially on the show birds. Note the EA-6B above in the center– I tried very hard to get the multiple windows right. Given the tiny size, the shakiness of 56-year-old hands, and the magnification involved, I thought they turned out pretty well. Same thing on the crane and the tractors. Aircraft national emblem decals came with the kit and they are helpful, but not very accurate for the later tactical schemes since they are too prominent. I used them anyway.
To attach planes and people, I use gel superglue, applied sparingly to the the contact points (the landing gear for the planes, the legs for the crew). I had to use high-powered magnifiers to do the crew successfully, as well as a fine set of tweezers. I also had to be super careful to not knock down previously-added crewmembers when putting on more tiny little dudes. Occasionally I had to prop them up while the glue set. Even with that I had a couple of instances of “man overboard” (yet another reason I was glad the Eduard set had many extras).

And there you have it. The project that kept growing and growing has been finalized at last. Enormously satisfying, after four years of wanting to reach this point.
Done. Right? Well, what’s a carrier without its battle group? Destroyers and cruisers and frigates and even subs…
Stay tuned as I build the cruiser USS Bunker Hill in 1/700-ish! 

One comment